Saturday 30 December 2017

Tutorial 16 - Easy 4-patch block

Today's very easy tutorial is the 4-patch block. Here's how to do it:

First, cut out 4 square pieces of fabric (any size you like), all 4 pieces must be the same size. For this example, I'm using 4 inch squares.
                                             

Sew in the order as shown, seam allowance is 1/4 inch (about 0.5cm).


Here is what I did with the above block - a simple Cathedral Window pincushion. :)
Front and Back views.


Another example is the 4-patch pencil cases which I have just made for the girls. (New school year starts on 02 January 2018.)


Another simple block made by sewing 3 pieces of fabric together lengthwise! :)

Hope you will find this tutorial useful! 
Happy Crafting and Happy New Year!! :)


Patchwork Hot Air Balloons

I needed to store my needles and pins (conveniently) in one place so I made an extra Big Pincushion! :D  I saw a lovely hot air balloon poster and it was my inspiration to make this pincushion. I am really happy with the way it turned out and it's really useful too! :)

A little sewing tip: I use the big buttons as "needle markers" to store sewing needles only - this way, I always know where all my needles are! :)


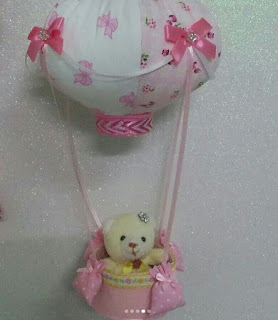
 After sewing my sweet hot-air balloon pincushion, the girls also wanted one for themselves. So here are the hanging mobile "hot air balloons" I made for each of them.

Eldest daughter wanted hers in Circus/Halloween colours.


Youngest daughter wanted hers Sweet and Pink.


Needless to say, we all had a lot of fun making these - the girls enjoyed choosing their fabrics and trims and I really enjoyed making these for them. :)

Hope these will inspire you to make things with your children too! Happy Crafting! :)


Friday 22 December 2017

Tutorial 15 - Easy to make felt Storage Boxes

These storage boxes are made from felt and are very easy to make. You can make them any size you like - but it's a good idea to make a template first as it is not very easy to draw onto felt. Also, the felt I am using is quite thin (it's the only type I can get here) so I am using 2 pieces to make 1 box (using contrasting colours so you can see better). However, if your felt is thick, you need only 1 piece.


Here are the instructions - First, make a square/rectangle template (of any size) with borders of equal width. For this example, I drew a 6 inch square with 2 inch borders. Cut out the template, as shown.


Since the felt I'm using is quite thin, I have to use 2 pieces to make 1 box.


I machine stitched the edges together but you can hand stitch, if you like.


Decorate as you like! :)
                             
Hope you like this easy project and find it useful!
Happy Crafting Everyone! :)

Tutorial 14 - Easy to make mini felt Christmas Slipper Pockets

This is a cute, sweet and last minute Christmas gift idea which we really like it and want to share  with you - Felt slipper pockets for holding chocolates and candies! :)


Here's how to make it - For the paper soles, I used contrasting colours so you can see better but you could use coloured construction papers to match the felt.  Also, if you like, you can sew the slippers by hand or machine. But we found gluing to be so much faster. :)


Hope you will have as much fun making these as my girls and I did!  
Merry Christmas Everyone! :D

Thursday 7 December 2017

Tutorial 13 - Easy to make mini Christmas Tree Pencil (or Pen) Topper

As Christmas is just round the corner, here is another very easy project to make with the kids - mini Christmas Tree pencil (or pen) toppers. 

Here are the instructions!


Hope you will like this simple project too - Happy Crafting Everyone! :)

Tutorial 12 - Very easy to make mini felt Chirstmas Tree

Today, I will show you how to make this sweet little felt Christmas tree. It's a fun and easy project to make with the kids! :D


Here are the instructions, as shown below:


You can also try with other coloured felt.  Here are a few variations:


Hope you and your kids will enjoy this easy project! Happy Crafting!! :D

Thursday 23 November 2017

Handphone Pillows

There are many tutorials online on making this useful little gadget - Handphone Pillow and so I made some  too! :)


Made these 2 specially for my girls - Patchwork pillows on pedestals to avoid spillage from food and drinks onto their handphones! :D 
(The "pedestals" are actually small biscuit tins!)


They were so fun to make that I had to make one for myself too! :)


Hope you readers are all having a wonderful day and Happy Crafting Everyone! :)

Tutorial 11 - Easy to make Sachet with ties

Today, I'm making sachets like this one shown below. 
They can be used as a gift bags for small presents and are so easy to make too!
Here's how you do it. :)


1) Firstly, cut out a piece of square fabric, about 30 cm, For this project, I am using a square Lady's Handkerchief (the size is about 30cm).


2) Fold the 4 corners of the fabric square to meet at the centre (as shown) and sew along the red lines. This will make a "tunnel" for the ribbon, yarn or string ties to go through.


3) Use a bodkin or safety pin to thread the ties through the "tunnel", Do one side at a time. Both ties will end directly opposite each other.


4) Pull the ties and make a bow. Fluff out the 4 corners so that they look like petals.

And there you go! A pretty little sachet! :D

I hope you like this easy project! 
Happy Crafting! :)